Game Scenes
GuideME has a custom tag for interactive, real-time views of an in-game scenario.
<GameScene>
  ...
</GameScene>
The tag also supports the following attributes:
| Attribute | Description |
|---|---|
| zoom | Allows the scene to be shown at a bigger scale. Defaults to 1. |
| background | A color value allowing to change the background of the scene. |
To add actual content to the scene, add additional tags to the scene tag. The most important
tag will be <ImportStructure /> to place a structure from a NBT or SNBT file in the scene.
In the following example, the structure from the test.snbt file located next to the page will be shown:
<GameScene zoom="4">
  <ImportStructure src="test.snbt" />
</GameScene>
The following subsections explain the different available tags within a <GameScene /> tag.
ImportStructure
As explained above, this tag will load a structure from the file supplied in the src attribute and
place it in the scene. Both .nbt and .snbt structure files are supported. The path given in src
can be relative to the current page.
To easily create such structure files, use the AE2 test-world (use /ae2 setuptestworld in a single-player creative
void-world).
It has a plot that provides LOAD/SAVE/CLEAR functionality in a 16x16 space to more easily author structures for the
guidebook.
The ImportStructure tag can be used multiple times within a game scene, with the same or different structure files.
To place imported structures at different positions, you can use the pos="x y z" attribute to change the structures position.
Block
Example that shows a lit furnace next to an unlit one:
<GameScene>
    <Block id="minecraft:furnace" />
    <Block x="1" id="minecraft:furnace" p:lit="true" />
</GameScene>
This tag allows a single block to be set in the scene. When used with id="minecraft:air", it can also be used
to clear blocks previously set by importing a structure (to hide certain blocks, for example a creative energy cell
used to power a setup).
The tag also supports the following attributes:
| Attribute | Description |
|---|---|
| id | Id of the block to place. |
| x | x coordinate of the block. Defaults to 0. |
| y | y coordinate of the block. Defaults to 0. |
| z | z coordinate of the block. Defaults to 0. |
p:<name> | Allows setting arbitrary block state properties on the block, where <name> is the name of a block state property. |
Entity
You can add entities to your scene as well, using the Entity tag.
The attributes follow the format used by the /summon command:
| Attribute | Description |
|---|---|
| id | Entity type id as used by /summon. For example minecraft:sheep. |
| x | x coordinate the entity is centered on. Defaults to 0.5. |
| y | y coordinate at the bottom of the entity. Defaults to 0. |
| z | z coordinate the entity is centered on. Defaults to 0.5. |
| rotationY | Sets the rotation around the Y axis of the entity in degrees. Defaults to -45. |
| rotationX | Sets the rotation around the X axis of the entity in degrees. What effect this has depends on the entity. |
| data | Allows setting the initial NBT data of the entity. Uses the same format as /summon. Example: {Color:2} for sheep. |
Example:
<GameScene zoom={4} interactive={true}>
    <Entity id="minecraft:sheep" data="{Color: 2}" />
</GameScene>
Which shows as:

IsometricCamera
This tag allows more fine-grained control over the isometric camera used to render the scene.
<GameScene>
    <Block id="minecraft:furnace" />
    <IsometricCamera yaw="30" roll="60" pitch="90" />
</GameScene>
The default rotation if this tag is not present is equivalent to:
<IsometricCamera yaw="225" pitch="30" />
The tag supports the following attributes:
| Attribute | Description |
|---|---|
| yaw | An angle (in degrees) that specifies the rotation around the Y-axis. Defaults to 0. |
| pitch | An angle (in degrees) that specifies the rotation around the X-axis. Defaults to 0. |
| roll | An angle (in degrees) that specifies the rotation around the Z-axis. Defaults to 0. |
Annotations
Annotations add elements to the scene to give additional information to the player. There are various types that are explained in the following sections.
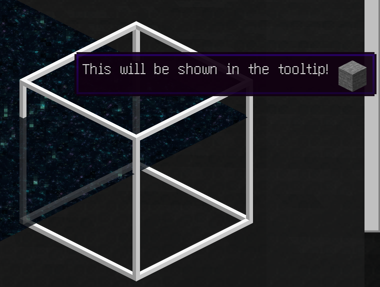
Every annotation tag allows for complex tooltip content to be added:
<BlockAnnotation x="0" y="0" z="0">
This will be shown in the tooltip! <ItemImage id="minecraft:stone" />
</BlockAnnotation>
Will show as:
BlockAnnotation
Annotates a single block in the scene with a box outline. In addition to its content being shown in the tooltip, it supports the following attributes:
| Attribute | Description |
|---|---|
| x | The x-coordinate of the block position to annotate. Defaults to 0. |
| y | The y-coordinate of the block position to annotate. Defaults to 0. |
| z | The z-coordinate of the block position to annotate. Defaults to 0. |
| color | Specify a color for the box around the block in HTML notation (#RRGGBB). Defaults to white. |
Example:
<BlockAnnotation x="0" y="0" z="0" color="#ff0000" />

BoxAnnotation
Annotates a block bounding box in the scene with a box outline. In addition to its content being shown in the tooltip, it supports the following attributes:
| Attribute | Description |
|---|---|
| min | The lower bound of the bounding box given as a vector of the form x y z, i.e. 0 0 0. |
| max | The upper, exclusive bound of the bounding box given as a vector of the form x y z, i.e. 0 0 0. |
| color | Specify a color for the box around the block in HTML notation (#RRGGBB). Defaults to white. |
| thickness | The thickness of the outline around the bounding box. Defaults to half a texture pixel in world-coordinates (0.5/16). |
| alwaysOnTop | When set to true (default is false), the box will never be occluded by blocks in the scene. |
Example:
<BoxAnnotation min="0 0 0" max="1 1 2" color="#ff0000" />

LineAnnotation
Adds a three-dimensional line to the scene. In addition to its content being shown in the tooltip, it supports the following attributes:
| Attribute | Description |
|---|---|
| from | The start of the line given as a vector of the form x y z, i.e. 0 0 0. |
| to | The end of the line given as a vector of the form x y z, i.e. 0 0 0. |
| color | Specify a color for the line in HTML notation (#RRGGBB). Defaults to white. |
| thickness | The thickness of the line around the bounding box. Defaults to half a texture pixel in world-coordinates (0.5/16). |
| alwaysOnTop | When set to true (default is false), the line will never be occluded by blocks in the scene. |
Example:
<LineAnnotation from="0 0 0" to="2 2 2" color="#ff0000" />

DiamondAnnotation
Adds a 2D diamond icon on top of the scene, anchored to a position in the scene. In addition to its content being shown in the tooltip, it supports the following attributes:
| Attribute | Description |
|---|---|
| pos | The world position to anchor the diamond to, given as a vector of the form x y z. Note that 0.5 0.5 0.5 is the actual center of a block. |
| color | Specify a color for the diamond in HTML notation (#RRGGBB). Defaults to white. |
Example:
<DiamondAnnotation pos="1.5 0.5 0.5" color="#ff0000" />

Block Annotation Templates
You can use <BlockAnnotationTemplate /> to apply the same annotation to all blocks of a type (and specific blockstate properties)
in the current scene.
The BlockAnnotationTemplate tag requires an id attribute with the block id that the annotations should be applied to.
Optionally, you can specify additional filters on blockstate properties using p:<name>="<value>" attributes.
Since the template will only apply to the blocks that are in the scene when the tag is parsed, make sure it comes
after any ImportStructure tags in your scene. If you combine multiple structures, you can also use this to your
advantage.
Example:
This applies a diamond annotation to every stripped spruce log aligned with the x-axis in this scene, which happens to be two of the four.
<GameScene zoom={2}>
  <ImportStructure src="test.nbt" />
  <BlockAnnotationTemplate id="minecraft:stripped_spruce_log" p:axis="x">
    <DiamondAnnotation pos="0.5 0.5 0.5" color="#ff0000">
      Special Logs Tooltip
    </DiamondAnnotation>
  </BlockAnnotationTemplate>
</GameScene>

Remove Blocks
If your structures contain dummy or structural support blocks that you'd like to remove before showing the scene,
you can use the <RemoveBlock id="block_id" /> tag. It will remove blocks of a given type without updating neighboring
blocks. One use case for example is to remove blocks that are only present to support redstone wire or wall torches.
Optionally, you can specify additional filters on blockstate properties using p:<name>="<value>" attributes.
Example that removes all barrier blocks from the scene after importing a redstone structure:
<GameScene>
    <ImportStructure src="redstone_test.nbt" />
    <RemoveBlocks id="minecraft:stone" />
</GameScene>
